| Modeling/ Snapping to Points Using Dragging |
Snapping to Points Using Dragging
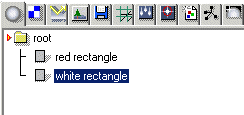
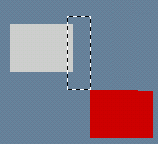
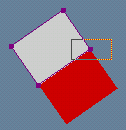
Many tools in the program require 3D geometry points as inputs. Typically, these geometry points are entered using the mouse, which is not a very accurate input device. Snapping allows you to snap the entered mouse points to existing geometry points, achieving exact results during various modeling tasks. In this tutorial we go through some basic snapping techniques, such as using the drag box and the lasso selector, as well as 'snap to nearest point'. You will find this functionality very useful in many modeling tasks. Dragging'Dragging' supported by the View window is a very powerful modeling aid. It allows you to snap to all existing points, pivot points, mid points and so on, all in one simple operation. Consider the following situation: You have created two rectangles (red and white) and you have to align them so that the left top corner of the white rectangle matches exactly the right bottom corner of the red rectangle.
Do this: 1. Create two analytic rectangles as shown in the image above. 2. Select the 'white' rectangle and activate the Move tool (by hitting 'm' key or from the 'Transformation' tab of the toolbar).
3. Move the mouse near the left top corner of the white rectangle. Press down the left mouse button and move the mouse. Drag box is shown. Move the mouse so that the left top corner is 'inside' the drag box. Then release the mouse. The corner of the rectangle was 'snapped' into the mouse pointer. Now, move the mouse and the left top corner of the white rectangle follows the mouse precisely.
4. Now, drag over the right bottom corner of the red rectangle to snap the 'left top' corner of the white rectangle to the 'right bottom' corner of the red rectangle.
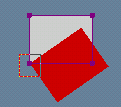
You can also drag over multiple points. In this case, all points inside the drag box are 'averaged'. This allows you to snap to the middle point of the dragged points. For example, let's move the left top edge of the red rectangle to the middle of the right vertical edge of the white rectangle. 1. Select 'Edit/Undo' form the pulldown menu to restore the original situation. Select the red rectangle and activate the Move tool. 2. Drag over the top left corner of the red rectangle. Move is activated and the dragged corner follows precisely the mouse. 3. Drag over the left vertical edge of the white rectangle so that its right edge is completely inside the drag box, and release the mouse. Correspondingly, you can snap to the center of an object by dragging over the entire object. This 'averaging' feature built in to the dragging makes the dragging very powerful feature because it allows you to achieve several important snapping methods through one easy to use interface. Let's see how you can take advantage of the dragging feature with the Rotate tool. The starting situation is this:
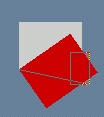
The task is to move and rotate the white rectangle so that its bottom edge matches exactly the top edge of the red rectangle. Thanks to dragging, it takes just a couple of mouse clicks to do this. 1. Select the white rectangle and activate the Move tool. 2. Now, using dragging, move the left bottom edge of the white rectangle to the left top edge of the red rectangle just like we did in the previous examples.
Next we should rotate the white rectangle about its left bottom corner to get the edges aligned. 1. Make sure the white rectangle is still selected and activate the Rotate tool (it is in the 'Transformation' toolbar tab). 2. Drag over the left bottom edge of the white rectangle. This snaps the rotation center precisely to the corner. 3. Enter the second point for the Rotate tool by dragging over the right bottom corner of the white rectangle. If you now move the mouse, the bottom edge points precisely towards the mouse. 4. Enter the last point for the Rotate tool by dragging over the right top corner of the red rectangle. Edges are now precisely aligned! Note: dragging averages all points inside the dragged area, including overlapping ones. For example, dragging over the white rectangle in the image above does not snap to the center of it, because the top edge of the red rectangle becomes included as well. The average of two points of the white top edge, two points of the white bottom edge and two points of the red top edge is not the middle point. As you can see, dragging is an extremely simple but extremely powerful feature. With just a couple of mouse clicks you can move, rotate and scale about any point. Lasso selectorIn addition to the rectangular drag box, you can use a lasso selector to pick up geometry points. You can activate the lasso selector by holding down the 'lasso selector' modifier. By default, this modifier is bound to the key '4'. Press down this key and drag on the view window to see the lasso selector.
3D snappingMost people still use a two dimensional monitor and a mouse. This means that you can only see the position of a point using two coordinates 'x' and 'y'. By default, dragging eliminates the third 'z' (depth) coordinate so that when you, for example, move objects using dragging, their 'depth' is not affected - the distance from view's camera to the two rectangles above did not change in the dragging operations. By holding down a special depth modifier you can override the default behavior and dragged points are entered as true 3D points. The default key for depth modifier is ',' (comma). Snapping to the nearest pointIn addition to dragging, you can snap to single geometry points using 'snap to nearest' modifier. Current mouse position is snapped to the nearest snap point when you hold down the key '5'. The nearest point snapping works always in 3D (the depth changes as well). Note, that snapping starts as soon as you press down the left mouse button. This means that you can drag the mouse around and see which snap point becomes selected - release the mouse button when a suitable one is found. Snapping to the nearest curveBy holding down the key '6', you can project the current mouse position on the nearest curve point (any point, not only edge/control point).
|
 |
 |

